
This thread will treat in more detail the STEP 3 described in my general thread of GSM that explains how to get these numbers to decode and unencrypt your own voice call or SMS.
1) TMSI number:
Temporary mobile station identitie (TMSI) number is allocated within a VLR for enhancing the system security. A TMSI corresponds to an IMSI uniquely within a VLR.
The structure of TMSI can be codetermined by the carrier and the equipment provider.
The principles for TMSI allocation are as follows:
- A TMSI is composed of 4 bytes, which can be 8 hexadecimals.
- The 32 bits of a TMSI cannot be all ones, because an all-one TMSI in a SIM card indicates an invalid TMSI.
A typical example of TMSI is 60340039.
The TMSI number is the identification that the BTS tower give to every MS (Mobile Station), which is your mobile device, to identify it and distinguish it from the other terminals that are connected with the BTS tower.
This TMSI number will be assigned to your device when entering in the area of coverage of the BTS and the BTS can assign this number for one comunication between your MS and the BTS only or can reuse this number for your MS if you don’t move from the area of coverage of this BTS. I mean if you make a voice call and then make another one, the same TMSI number will be used by the BTS tower for your MS.
Sometimes the BTS tower ask the MS for the IMSI number which is unique for each MS. But the BTS tower try to reduce the transfer of this number by the UM Interface or Air Interface (Interface between the BTS and the MS) because of avoiding sniffing the identification number of the MS. Because of this reason is why it uses the TMSI which is a number which is not always the same and don’t really identifies the MS at other area coverages or at other connections with the BTS.
2) Kc key (or cyphering key):
The second is the Kc Key, which is a number extracted with the GSM algorithm and is different for every communication between the BTS and the MS. This number is the output from the GSM.
Official description: The Kc is the 64-bit ciphering key that is used in the A5 encryption algorithm to encipher and decipher the data that is being transmitted on the Um interface.
This is extracted from the document recommended in the GSM general thread mentioned above named GSM_for_dummies. This document explains in detail all the parts of the encryption the numbers extracted and used through all the process, and all the necessary infromation to understand how the system works.
The RAND and Ki are the input into the A8 encryption algorithm to extract the Kc key. This can be seen in the above document at page 28.
So this Kc key is fundamental to decode the conversation and we have to obtain it. There are some methods to obtain this key and they are explained at this thread: http://domonkos.tomcsanyi.net/?p=369 (The method which I have used is the third one listed in this link and I will explain in this post in more detail.)
REMARK: It’s important to notice that with all these methods you will only be able to get your own Kc key and not the others Kc keys, which means that you won’t be able to crack GSM voice calls or SMS from others. You will only be able to crack your own voice calls and SMS messages.
There was another method of obtaining this key apart from the ones explained in the link and which enables to get the Kc key of others too. This method is using the Kraken tool, I talked about this tool in my other thread but I can’t get the tool running correctly. This is all explained in my other thread.
3) Process to get these 2 numbers or keys:
First of all I remark that the 2 numbers (TMSI and Kc) are obtained by the same procedure. This procedure is named AT commands.
AT commands are used to communicate via terminal or user interface to a Modem and get infromation about this Modem. In this case the Modem will be the Mobile phone with the android system and the part of the device we want to get access is the SIM card, which are stored these 2 numbers and where we have to enter after every voice call or SMS to get these numbers of the last communication between the BTS and the MS.
For this reason is why I have only been able to get these numbers with a Samsung android device. The Stock ROMs of the Samsung devices brings the possibility to communicate through the android device like a Modem. I mean when you connect the Mobile to the PC via USB, this device will be recognized by the system like a memory storage (DCIM), like and ADB interface (if you have installed the ADB software of android) and finally like a Modem that brings you the possibility to communicate through AT commands like any other Modem to the SIM card of the Mobile phone and extract the 2 necessary numbers.
It’s important to remark that I’m using a Samsung Galaxy s GT-I9000 model and that I suppose by some comments on different Forums and some google search that all the Samsung devices have this special option of Modem. I pretty sure that I’m not wrong but the only thing you have to do is to check it out.
I know that some of the concepts that I talk about above can be unknown for you, this is the reason why, first of all, I would like to describe all of these concepts and to describe some parts of the Android operating system to bring the possibility of understanding all the parts of this process.
A) Description of the Android System:
First of all it’s important to know that at all versions of the Android system which uses a lot of Mobiles devices, there are some hidden options that enables you to check some sensors and to get some advanced and technical information that is not really shown to the users but can be consulted if your want.
The next link shows the codes you must enter to the dialer application of your Android device to get some information about your system like the BTS tower which is connected with at the moment or some tests of the sensors of the device, etc: http://www.askvg.com/google-android-hidden-secret-codes/
I also recommend you to read my other thread about this topic.
It’s important to take into account that Android operating system is a linux distribution that is restricted by the user and in which you are not able to get access in all parts of the system. So like any other linux distribution we must have superuser privileges to do some kind of things that are prohibited by the normal user, like accessing to some files of the system or installing certain applications that are not in google play store, etc.
First of all I would like to recommend you to read and understand what are the main terms that could be used in this thread about the Android system and what kind of words you have to understand. Here are the main definitions and principal concepts: http://forum.xda-developers.com/showthread.php?t=1930844
Also read about PIT files: http://forum.xda-developers.com/showthread.php?t=999097
And another link about similar concepts than the first one: http://forum.xda-developers.com/showthread.php?t=2416235
So according to this link:
ADB (Android Debug Bridge) description: adb are two different applications — one running on your computer (Windows, Linux or Mac) and one running on your phone. When your phone is connected, and USB debugging is enabled, you can issue commands and communicate with the phone using your computer screen and keyboard.
So ADB is the quickest and most useful way to control your Android device through your PC by terminal prompt and make it more simple to enter commands that can be with your device.
Once you have written all of this information the only thing you must know and check about your Samsung android device is that if it has the Stock ROM. I mean that the ROM was not changed by a Custom ROM like CyanogenMOD or others. Because the Stock ROM allows us to access the SIM card like a Modem.
STEP 1:
To check out if it’s possible to be recognized like a Modem you have to follow the next steps.
First you have to enable some settings of the phone before connecting it via USB to the computer:
Settings –> Aplications –> Unknown sources (enable this option)
Settings –> Aplications –> Development –> USB Debugging (enable this option)
Then you are prepared to catch the USB cable that comes with the device and connect it to your computer.
It will appear on your mobile a tab that shows that the device is connected through USB.
In the computer to check if it’s recognized like a Modem, you only have to do a pair of things.
a) Linux operating system: Open a terminal prompt and enter the command
cd /dev
(This will bring you to the directory where are palced all the devices and you have to check if a device named ttyACM0 appeared. If it appears, congratulations! Your device is prepared.)

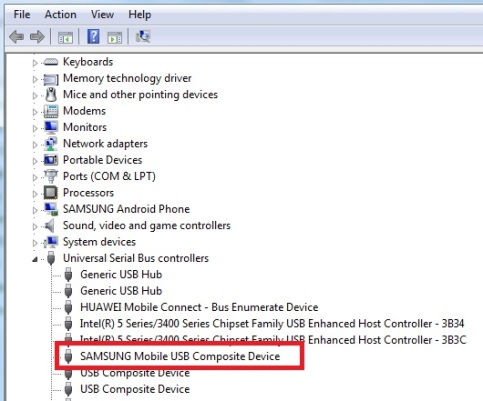
b) Windows Operating system: Open the Control Panel in Initial menu and enter to Security and System –> Device Administrator, here has to appear a tab with the name Modem and you have to click and open it. Inside have to be a Modem device named: Samsung USB Composite Device. You can click the right button on it and open Properties, then go to the tab named ………… and make a AT command test.
Note: These are the steps to enter in Windows 7 operating system, but in other Windows versions they have to be similar.
If all these check outs have gone well, you have to continue installing Minicom software (in Linux operating systems) or Hyperterminal software (in Windows operating systems) to get the 2 numbers.
In case you didn’t get the device recognized like a Modem it’s possible you don’t have the Stock ROM of Samsung installed and I recommend you to downgrade your Android version or to change your Custom ROM to the original one. In my case, Samsung Galaxy S GT-I9000 has the Android 2.3.6 or 2.3.7 versions. I have seen some cases that even a older version of Android. So it’s possible that newer versions are Custom ROMs or updates that are not the original ones.
To do a downgrade and get the original version, see my other post.
B) Minicom and Hyperterminal install:
B.1) Hyperterminal Install (Windows operating system):
The only thing you have to do is to download the files of this web page and run the executable file inside the downloaded and decompressed folder.
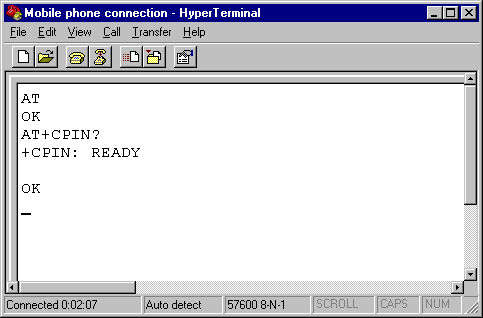
You only have to click and download the .rar file then extract all the files. To use it, you don’t have to install anything, only run the executable file and a first window will open like the next one:

You have to enter a name for the communication, choose any name, and click on the phone icon. Then it will ask for what kind of communication you want. You have to enter the option of COM3 or COMx where x is the number of your COM port which is connected to the mobile. Don’t worry if you don’t know exactly the number of the port, if you only have the device connected it will show only one COM port option.
Then it will show the window where you have to enter the AT commands. To check if it works well, enter AT and press start. If it returns OK, it means that all is correct.
The final window is something like this:
B.2) Minicom Install (Linux operating system):
This software hasn’t any graphical interface but is really the same than Hyperterminal in Windows but you have to use it through the terminal prompt.
This is a link that talks about Minicom but it’s not really necessary to read it: http://lachlanmiskin.com/blog/2012/08/03/using-minicom-to-interface-with-serial-devices-on-linux/
To install Minicom in your Linux operating system follow the next steps:
sudo apt-get install minicom
sudo minicom -s
After this, you have to open a new terminal prompt and enter the command:
dmesg|grep tty
(This command will show all the serial ports and you have to find your own serial port to communicate. As we have said before our port has the name ttyACM0).
So you can close the second terminal and return to the first one. You have to select with the directions buttons the option: Serial Port Configuration.
Here you have to enter the letter of the fields you want to change, so the following fields must be changed like this:
ttyACM0 ---- Serial Device
9600 Bps/Par/Bits,"8-N-1" ---- Parity Bits
Yes ---- to Hardware Control Flow
no ---- to Software Control Flow
That’s all you have to change. Accept and save the file of configuration with a name that you can remember later.
In my case I had saved the file with the name configMinicom.
So now the install and configuration of Minicom is finished.
The only thing you must do to open Minicom is:
sudo minicom configMinicom
The Configuration file is saved at your system at the following path: /etc/minicom

So now you can try to enter AT as a check if the software runs correctly and if it returns OK like in Hyperterminal case, it means that all is correct.
Remark: Sometimes it’s possible that Minicom and Hyperterminal don’t write the command one enter but even if they are not displayed, the answers will be displayed too and the commands are entered without any problem is just an error that sometimes occur and brings to think that perhaps the software is not running properly, but there is not a problem.
To exit Minicom you have to enter CTRL + A and then X and enter button.
To see some more detailed minicom setup: http://omappedia.org/wiki/Android_Build_Minicom
STEP 2:
Now that we have installed Minicom in Kali Linux for example, we can connect our Samsung device and begin to enter AT commands to access the SIM card.
To get the 2 numbers that we are talking about during all this thread we have to follow the steps of this link: http://openbsc.osmocom.org/trac/wiki/A5_GSM_AT_tricks
It’s important to follow the position of every command to get the correct result. The command that we will use is the AT+CSIM command which is the one that give generic SIM acces.
This command is really complex and there is short information about it. There are other AT commands that might be useful like AT+CIMI which give us the IMSI number.
FIG exampleMINICOM…………………………..
I know that in the tutorial there are the commands and the answers but in my case the answers are a little bit different and I want to show you my own results:
AT –> To prove that the connection is enable.
ATi –> To see the kind of mobile model.
AT+CPIN? –> To check that the SIM card is ready and enable.
After these few commands we will begin with the AT+CSIM command and the necessary procedure.
First of all we have to run the GSM algorithm:
AT+CSIM=14,”A0A40000027F20″
+CSIM: 64,”00005C5E7F2002005555FF011113001D0700838A838A00838300008300009000″
OK
AT+CSIM=42,”A088000010FFFFFFFFFFFFFFFFFFFFFFFFFFFFFFFF”
+CSIM: 4,”9F0C”
OK
In this step it says that extracts the SRES and Kc numbers but in my case this isn’t correct. This is the different part.
Then we have to read the EF files from the SIM card:
AT+CSIM=14,”A0A40000026F20″
+CSIM: 34,”000000096F20040011FF44010200009000″
OK
AT+CSIM=10,”A0B0000009″
+CSIM: 22,”807F65C9C99DD800039000″
OK
Here we can identify the KC key hexadecimal number: 807F65C9C99DD800 and the sequence number: 03. This is the Key we have to enter at Airprobe with the go.sh (STEP 8 of my general GSM thread) command to decode the information.
Then to extract the TMSI number enter:
AT+CSIM=14,”A0A40000026F7E”
+CSIM: 34,”0000000B6F7E040011FF14010200009000″
OK
AT+CSIM=10,”A0B000000B”
+CSIM: 26,”980267C912F4105458FF009000″
OK
Here we can identify the TMSI hexadecimal number: 980267C9.
This is the number that must be identified in wireshark to know what is you own voice call.
REMARK: I want to notice that these numbers seems to be correct but in the case of obtaining the IMSI number through the same procedure and through another AT command like AT+CIMI, the results are different and this bring me to the conclusion that it’s possible that these numbers are not correct at the 100%. Although, is the only way I have been able to obtain these numbers and I don’t know how to get them in any other way.
I mean that these results are different and they might be the same:
AT+CSIM=14,”A0A40000026F07″
+CSIM:34,”000000096F07040014FF14010200009000″
OK
AT+CSIM=10,”A0B0000009″
+CSIM: 22,”0829411055703851509000″
OK
AT+CIMI
214015507831505
OK
In this second case the IMSI number is: 214015507831505. But in the first one, the IMSI is different. If we convert this number into the hexadecimal format we obtain: C2A55E521AD1. And this is not the number of the above command.
For this reason I investigate more about how to use the AT+CSIM command and I found this link where there are a lot of papers of how to use the command. Inside this link there are all the papers related to the command at this submenu: http://www.3gpp.org/ftp/specs/archive/51_series/51.011/
I only downloaded the first paper (or the first .zip file) and there are a lot of interesting things about the AT+CSIM command. Anyway it’s not easy to understand.
A thread in XDAdevelopers web page talks about AT commands too, I recommend you to read it and make an idea of what we are doing here: http://forum.xda-developers.com/showthread.php?t=1471241
Also there’s another way of entering AT commands through the adb shell (See my other thread where explains how to install and use adb shell) that is explained in this other link:
http://codesigns.altervista.org/blog/2011/12/23/at-commands-on-android/ (But I wasn’t able to found the correct tty to send AT commands.)
It explains a little more about the Android system and its architecture but I think that is more oriented to developers.
So I hope that someone that knows more about this topic can help me and if not I suppose that these results are correct.

Retroenllaç: ADB install – Android system | [ADS-B aeronautical radar - Initial page] & [GSM cracking] (RTL-SDR concept)!!!
Retroenllaç: Custom ROM install – Android system | [ADS-B aeronautical radar - Initial page] & [GSM cracking] (RTL-SDR concept)!!!
Buenas, he probado el método en varios móviles (un par de ladrillos de nokia, un ZTE y un Samsung Galaxy Ace). En todos funcionan los códigos AT, ATI, AT+CPIN, y AT+CIMI como cabría esperar, pero en ninguno parece funcionar AT+CSIM. El ZTE me devuelve un “ERROR 100” (comando desconocido) y los Nokia un simple “ERROR”, así que me imagino que simplemente no tendrán la función implementada. Sin embargo, con el Samsung Galaxy Ace, que sería de esperar que tuviera el mismo mecanismo que el I-9000 al ser de la misma marca, época, y tener una versión parecida, me devuelve estas cadenas extrañas:
AT+CSIM=14,”A0A40000027F20″
+CSIM: “6E00″0A40000027F20″
OK
AT+CSIM=42,”A088000010FFFFFFFFFFFFFFFFFFFFFFFFFFFFFFFF”
+CSIM: “6E00″088000010FFFFFFFFFFFFFFFFFFFFFFFFFFFFFFFF”
OK
AT+CSIM=14,”A0A40000026F20″
+CSIM: “6E00″0A40000026F20″
OK
AT+CSIM=10,”A0B0000009”
+CSIM: “6E00″0B0000009”
OK
Etcétera, “6E00″input (sin la A)”, ¿estoy introduciendo mal los comandos? ¿Podría tener algo que ver con la configuración? Leyendo por Internet hay gente que ha conseguido enviar comandos Hayes a este móvil, pero con otro método (el de la shell ADB).
He probado tanto en minicom como en HyperTerminal, con el mismo resultado. También añadir que tengo el móvil rooteado y con la ROM de stock.
El resultado es el que yo sacaba también. Siendo sincero contigo, la verdad no me acuerdo de que significado tenían las cadenas pero sí recuerdo que en internet hay los manuales de los comandos AT y que de ahí se puede sacar el significado de las respuestas y lo que se significan. Espero haberte ayudado y gracias por leer mi blog. De todos modos creo que en algún sitio puse el link del manual que estoy comentando!
In case of IMSI, the result returned by AT+CSIM command is correct.
The difference is the way you read the result.
AT+CSIM=14,”A0A40000026F07″
+CSIM:34,”000000096F07040014FF14010200009000″
OK
AT+CSIM=10,”A0B0000009″
+CSIM: 22,”0829411055703851509000″
OK
(In binary analysis bytes are read it in this way 🙂
If you start reading from Right to left. After “9000”, you see “50” so reverse it “05”
similarly next hex is “51” which translates to “15”
“38” –> “83”
“70” –> “07”
“55” –> “55”
“10” –> “01”
“41” –> “14”
“29” –> “92”
Now append all of the results you get
92 14 01 55 07 83 15 05
Now the above number starts with “9”.
i guess its due to some offsets…but after 9, its the whole IMSI which you got from AT+CIMI.
AT+CIMI
214015507831505
OK
I tested the same on mine galaxy S advance and it works.
Thanks!!! It’s actually really helpful!
ATPi:
Manufacturer: SAMSUNG ELECTRONICS CORPORATION
Model: GT-I9001
Revision: I9001XXKPK
IMEI: 3*********************
+GCAP: +CGSM,+DS,+ES
AT+CPIN?:
Ready
ok
AT+CSIM=14,”A0A40000027F20″
+CME ERROR 4
😦
i converted IMSI to HEXIDECIMAL Entered it at AT+CSIM 14
AT+CSIM 10
Enter
AT+CIMI and get this same IMSI again
So reversing hexidecimal is confirmed working.