This thread is to talk about the android system, about what parts we can change and about what kind of acces we have inside the system like a normal user.
It’s important to notice that this thread is not roughly necessary for cracking GSM. First of all you don’t need to root your device or change the ROM if you have your original Samsung ROM and the device is recognized by the computer as a Modem.
That’s what you have to keep in mind. This thread will not solve other problems of sniffing GSM or capturing GSM frames.
My intention is to clarify some advantatges and disadvantatges that someone can have with a rooted phone or with a Custom ROM.It’s also important to notice that rooting the phone can give you some privileges that can overcome a lot of problems.
So let’s begin with the thread. First of all I would like to remember what I commented in a thread that I posted few days ago that says:
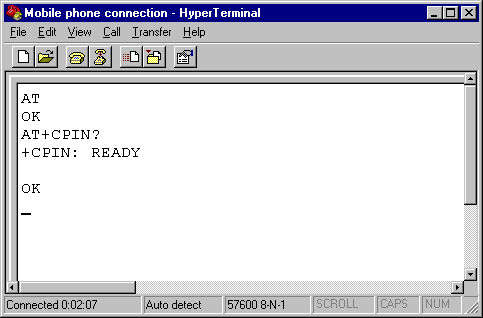
The Stock ROMs of the Samsung devices brings the possibility to communicate through the android device like a Modem. I mean when you connect the Mobile to the PC via USB, this device will be recognized by the system like a memory storage (DCIM), like and ADB interface (if you have installed the ADB software of android) and finally like a Modem that brings you the possibility to communicate through AT commands like any other Modem to the SIM card of the Mobile phone and extract the 2 necessary numbers.
And few lines after this paragraph:
It’s important to take into account that the Android operating system is a linux distribution that is restricted by the user and in which you are not able to get access in all parts of the system. So like any other linux distribution we must have superuser privileges to do some kind of things that are prohibited by the normal user, like accessing to some files of the system or installing certain applications that are not in google play store, etc.
First of all I would like to recommend you to read and understand what are the main terms that could be used in this thread about the Android system and what kind of words you have to understand. Here are the main definitions and principal concepts: http://forum.xda-developers.com/showthread.php?t=1930844
And another link about the same concepts than the first one: http://forum.xda-developers.com/showthread.php?t=2416235
Also read about PIT files: http://forum.xda-developers.com/showthread.php?t=999097
To know something more about the android system architecture check this link out.
Android System Layers: https://code.google.com/p/seek-for-android/wiki/SCAPI_modules_png
To root or flash your device remember to enable the USB debugging option in the settings menu before connecting it through the USB cable.
Mainly there are 2 different ways of getting superuser privileges on your phone:
1) Rooting your phone: rooting is essentially a process that allows users of smartphones, tablets or other devices running on Android to gain “superuser” access to the software. This will allow the user to perform administrative tasks such as writing to locations normally restricted by the system which in turn will allow for deeper customization.
2) Flashing a Custom ROM to your phone: Flashing refers to the overwriting of existing data on ROM modules present in an electronic device with new data. This can be done to upgrade a device or to change the provider of a service associated with the function of the device, such as changing from one mobile phone service provider to another or installing a new operating system.
In simple words flashing is called installing firmware on your phone.
REMARK: It doesn’t matter what is your choice, but a think that you might take into account is that only phones with unlocked bootloaders can be flashed. For this reason is why is prefered rooting your phone, because you can root your phone with a locked bootloader. When I talk about unlocked bootloaders I mean phones that can be unlocked even if they are locked now. Because there are some other phones that can’t be unlocked unles you pay to unlock them.
I recommend to search in the web page of XDAdevelopers your specific phone model and look for softwares to root it or to flash new ROMs. In my case, I will comment how to flash new ROMs on my Samsung Galaxy S GT-I9000 and root it and how to root my Sony Ericsson Xperia neo V (MT11i).
Sony Ericsson Xperia neo V (MT11i):
An advanced and complete analysis of the device can be found here: http://www.tuexperto.com/2011/08/25/sony-ericsson-xperia-neo-v-analisis-a-fondo/
A) Unlock the Bootloader:
My Sony phone has a locked bootloader, because of this I was only able to root it. You can check if you have a locked bootloader or an unlocked one by entering the next code in the phone dialer app:
*#*#7378423#*#*
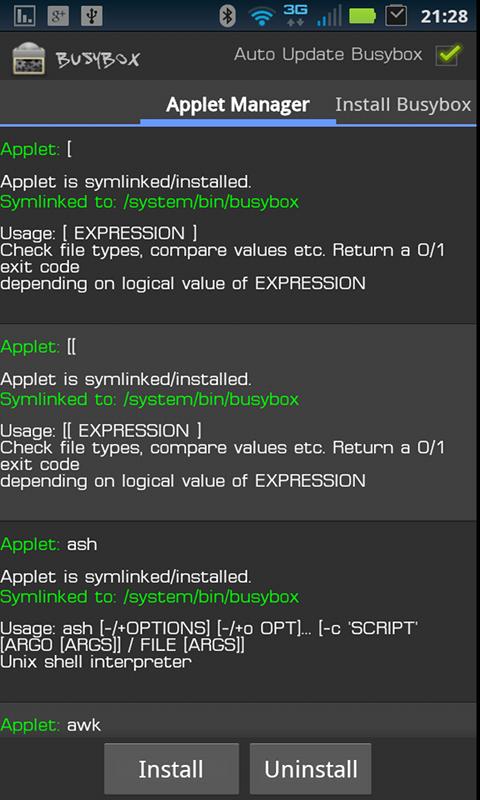 The Busybox app only works under superuser privileges and with the superuser app that will be installed with Eroot you can give these privileges to all the apps which requires them. The terminal emulator app will alson give you the possibility of entering the command “su”.
First of all we will talk about how to root the Samsung device and then I will show how to flash the device.
A) Unlock the SIM card of the Samsung:
This process is performed to be possible that the device works with different SIM cards of different service providers without paying to unlock the phone. The app you mmust download through the Google Play Store is the next one: https://play.google.com/store/apps/details?id=com.helroz.galaxysunlock&hl=es
With this you must follow the steps that it tells you and finally the phone will reboot and will be unlocked. In the case the phone doesn’t do anything, don’t worry! Just take off the battery and and put it again! The phone will reboot and will be unlocked when started.
It’s important to know that with this procedure the IMEI number will be changed by one that is unlocked. The IMEI number is the one who identifies your phone, so your are giving a false identification number to your phone and by this way, this new identification is unlocked and accepts all types of SIM cards.
There are a lot of other apps for unlocking the SIM card but now one works freely, all performs the process paying some money. I think this is the only free way.
B) Root the Samsung:
Once the device has been unlocked for the SIM card, we will proceed to root the device.
To root the Samsung we will use the Odin software that only works in Windows.
This software is perfect to root the device and flash Stock ROMs in case you want to do a downgrade (which is returning to the original ROM).
To download Odin, go to the next link: https://docs.google.com/file/d/0B7i-peey0VKiSmVTMXZzWUJyMW8/edit?pli=1
Download a CFroot file from the following link: http://galaxy-s.jimdo.com/root/cf-root/download-cf-root/
(You can choose any file that you one, only take into account your Android version, I mean if it’s a 2.2 or 2.3 android system.
Here there are some more CFroot files: http://forum.xda-developers.com/showthread.php?t=788108
Depending on each file, it will install the app named root and the ClockworkMod Recovery and even if the Busybox in some cases.
To root the device with Odin we will follow this youtube video: http://www.youtube.com/watch?v=Pq_2Z1drKzc
In my case I used the CFroot file named: CF-Root-XX_OXA_JW4-v4.4-CWM3RFS.zip The file is a .zip but you have to unzip it and use the .tar file.
Some advice to follow the youtube video:
1) To enter into the download mode: http://androidenprimero.blogspot.com.es/2012/02/actualiza-tu-movil-android-modo.html (Volume down + Home button + power button, at the same time)

2) To enter into the recovery mode: http://askubuntu.com/questions/300144/cant-boot-galaxy-s-i9000-into-recovery-mode (first press volume up and Home button and then pressing these ones, finally press the power button; in this order)

In case you need the drivers of Samsung can be downloaded here: https://app.box.com/shared/1674fdce6468d29dcde8 (But there’s no need to use them).
And also the Modem drivers of Samsung: http://drivers.downloadatoz.com/vendor_samsung/samsung-at-command-port/
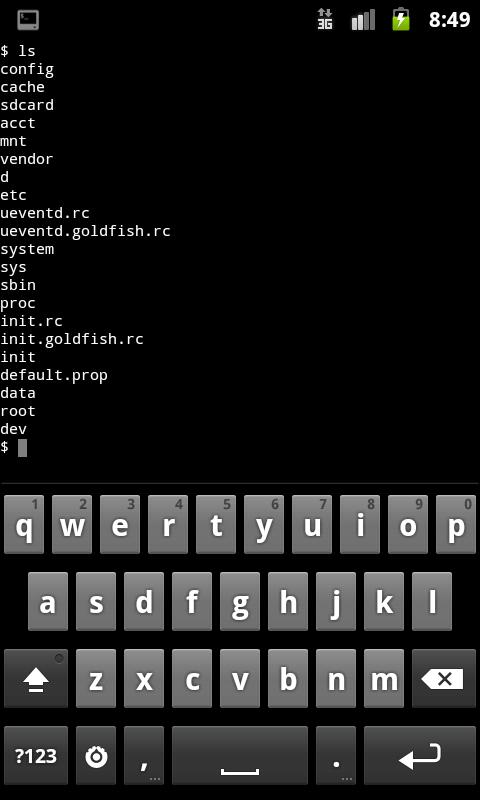
After this process the device will be rooted and you can do the same as before, installing Terminal Emulator app and Busybox app. When using the Terminal emulator app with your device disconnected from your computer it can be useful to know that the button combination: volume Up + W is the same as direction up button on a computer that shows the past introduced commands!
And that’s all the process to root your Samsung.
C) Flash the Samsung (upgrade to a more updated Android version):
Then to flash a Custom Rom like a CyanogenMod one, you only have to use the Recovery mode. This recovery mode is installed with CFroot file through the Odin software.
To flash a CyanogenMod ROM you can use this thread as a tutorial: http://www.androidauthority.com/galaxy-ace-s5830-android-2-3-7-gingerbread-cyanogenmod-7-cm7-65381/ (But I will explain the process in detail so I recommend you to follow my steps and use it if and only if you get lost).
I recommend you to flash a Custom ROM from CyanogenMod because are the most professional ones, and they really work very well.
To choose a CyanogenMod ROM go to this link and I recommend to choose an stable one: http://download.cyanogenmod.org/?device=galaxysmtd
To know what are the differences about stable, nightly and other ROMs read about it in the forum of cyanogenmod: http://forum.cyanogenmod.com/topic/74526-how-do-i-update-cyanogenmod/ (Here is explained what are the differences about the experimental, nightly, stable ROMs, etc.)
I recommend the CyanogenMod (CM) 10.2 stable version because is the latest stable version and it will bring to you the Android 4.2 Jelly Bean version, which is really cool. The CM11 will bring the 4.4 KitKat version but is not stable yet.
To upgrade the system you only have to use adb push tool, which I talk about at my other thread, to place the CyanogenMod ROM into the sdcard of the Android memory system. I have used the second part of this tutorial named “Installing CyanogenMod from recovery”. The first is to install a custom recovery but we have already installed it with CFroot file, so it’s not necessary the first part.
You have to enter on a terminal prompt, inside the directory where adb is placed, the next command:
adb push /home/usuari/Descargas/cm-10.2.0-galaxysmtd.zip /sdcard/
This command performs the task of copying files from the computer to the phone.
It’s also important to notice that you have to connect your phone with the USB cable to your computer and have Android SDK installed and adb shell running.
Then when the file is placed inside your SDcard, you only have to:
1) Disconnect your phone from your computer.
2) Shut down your phone, enter to the recovery mode as explained before.
3) Optional/Recommended: Select backup and restore to create a backup of the current installation on the device. If this option is missing, it’s likely because the stock ROM has overwritten your custom recovery on boot. So if it’s missing is not necessary to perform a backup.
4) Select the option to wipe data/factory reset. It will erase all your personal data so save all your information before.
5) Select install zip from sdcard.
6) Select choose zip from sdcard. And select the CyanogenMod .zip file.
And when the system reboot, you will have a Custom ROM from CyanogenMod installed.
It’s possible that CyanogenMod ROM detects that you are using a false IMEI number, but if a menu appears you only have to accept and no problem will appear. This is because the Sim card unlock performed before.
To activate the developer options in CyanogenMod you have to go to Settings menu –> About phone and press about 7 or 8 times the build number. This will enable the developer options. This option is really interesting because you can change the performance of the battery or change the frequency of the CPU.

These options are the improvements that brings the CyanogenMod to your mobile phone apart from rooting acces like before. So it’s because of this why the CyanogenMod ROMs are at the top of Custom ROMs.

Another thing that must be commented is that the Google Apps (Gapps) won’t come with the ROM, so you have to install them like you have done with the CyanogenMod file.
You can download the .zip file of Gapps at the following link: http://wiki.cyanogenmod.org/w/Google_Apps (Choose the one corresponding to the CyanogenMod version you’ve installled).
Then you have to enter to connect the phone through USB again, place the .zip file of Gapps in the sdcard, change to recovery mode and install the .zip file like before. It’s so easy!
Finally I would like to say that if you have a CyanogenMod you can install apps like SilentSMS which is a good help to get the TMSI number of the other part of the communication. You can read about it in: https://github.com/domi007/silentSMS
To install it you only have to follow the steps on the link. But if you don’t have a CyanogenMod ROM or any other Custom ROM that has the code signing turned off, the app won’t work for you. Because I don’t know how to turn off code signing in Stock ROMs.
D) Flash the Samsung (downgrade to a Stock ROM or to the original ROM):
This is a step by step tutorial that tells how to use Odin for upgrading your Stock ROM or downgrading it: http://www.123myit.com/2013/05/how-to-upgrade-the-firmware-2-3-6-on-a-samsung-galaxy-s/ (It doesn’t work for installing Custom ROMs).
We will use this method for downgrading to a specific Stock ROM of Samsung, because the upgrade process only allows us to install Stock ROMs which usually runs on 2.3.6 or 2.3.7 Android versions and if we want to update the Android to versions like 4.2 Jelly Bean Android version or even 4.4 Kitkat Android version, we have to use another method.

In this link there are all the tutorials about how to upgrade or downgrade your system to different ROMs, and these are the methods which I have explained above. If you want to check if you have made it correctly: http://forum.xda-developers.com/showthread.php?t=2434225
From this link you have to download the PIT files. There are some links before the topic upgrading to kitkat, where you can download Odin too. To choose which PIT file is the best I have searched a lot and there are few differences about it. I have used the first one which is the 512 PIT file. But choose whatever you want. The link is a .rar file that contains the 3 different PIT files that you can use. Read this thread about PIT files if you are not sure which one is the best: http://forum.xda-developers.com/showthread.php?t=999097
To downgrade your Android system to a Stock ROM of Samsung, you have to download few files more. These are the PHONE file, the CSC file and the PDA file which you can download at the following link: http://forum.xda-developers.com/showpost.php?p=14273101&postcount=1 (This link also shows how to use Odin to downgrade, but it’s very easy).
I don’t know exactly what these files are, but you have to download the combination which most suits you of all the download links of the link above. I think that you must catch the ones which are referred to your geographical zone like in my case I caught the ones for Europe but I’m not sure. Then also look the Android version you are installing; the options are: Gingerbread 2.3.3, 2.3.4, 2.3.5 and 2.3.6. Also choose the one for your model I mean there are some for Samsung I9000 and others for Samsung I9000M. And there’s a link to Froyo Android versions files to downgrade to them too. But it’s an older system and I don’t recommend you to choose it. It won’t bring any improvement to you Samsung.
After performing the downgrade you will have to use Odin Software again to flash a CFroot file to get the phone rooted again.Again it doesn’t matter which CFroot file you choose. If you catch a file that doesn’t works good, you can catch another one and flash it again with Odin.
This is the link to download CFroot files again: http://forum.xda-developers.com/showthread.php?t=788108
Don’t use the file named: CF-Root-XX_OXA_JVU_2.3.6-v4.3-CWM3RFS. I used it and it doesn’t work correctly.
The importance of Downgrading the system is because we will recover the Modem option which I talked about in my other thread.
That’s all the process you have to do to flash or downgrade to a Stock ROM. To guide you for some combinations of files that works very well I have tried the following ones:
a) GT_I9000_XWJWB_XWJW1_NEEJW2: This option installs an older version of Android system and doesn’t work well to use it as a Modem.
b) GT_I9000_XXJW4_XXJW4_OXAJW4: This is the best option you can use and works well in all aspects.
These are the .rar files which contains the PDA, PHONE and CSC files you need for the Odin and you can download them from the link above. These 2 cases works good, the second more than the first, and I recommend you to use them. After the use of Odin for the new Stock ROM you have to use CFroot to get the system rooted again.
They include the Google Apps (Gapps) which are the Google Play Store (if the version is old can be called Android Market yet, but you can update it), Google Maps, Gmail, Google search, Google talks, etc.
If you want to downgrade or recover your original ROM of Samsung that comes with your Samsung when you buy it, first you have to downgrade to a Stock ROM of Samsung. This will bring all the hidden menus of the dialer of Samsung, and then you have to enter the following code into the dialer app:
*2767*3855#
Do NOT enter this code without reading the paragraph below!!!
Think before you give this code. This code is used for factory format. It’ll remove all files and settings including the internal memory storage. It’ll also reinstall the phone firmware.
Once you give this code, there is no way to cancel the operation unless you remove the battery from the phone. So think twice before giving this code.
You can use this command to reset the original Stock ROM that you have with the Samsung without any update. This can be useful in case you have installed an update that doesn’t work properly.
This is alos posted in my other thread: https://ferrancasanovas.wordpress.com/2014/01/29/advancedhidden-menus-android-system/
The system will do all the things automatically and the original system will be recovered. the only thing you have to do is to press the HOME button when the recovery mode appears to choose the option: Reboot the system now!
It’s also important to say that if the phone is rooted, it will be rooted also after this recover.
That’s all I have done! I hope you to enjoy it very much!!!